Generic Process to Send Any IDOC’s to
SAP via WCF SAP Adapter
Ø
Subject: Setting the WCF Action dynamically in a
BizTalk Application
Ø
Applies to: BizTalk 2006 R2 and up
Ø
Recipe:
BizTalk Send Port, BizTalk Orchestration
Ø
Example Participants: WCF-SAP Adapter
Ø
Overview:
This example
focuses on sending multiple IDOC messages to SAP, all using one Send Port.
Often times there is a need to limit the number of LOB ports that can be
created as it necessitates giving usernames and passwords to multiple people or
when password changes there are multiple places to change which can be
cumbersome and also error-prone.
By having one
point of entry to a LOB system (SAP) in this case enables to have more control
and management over the entry points. Specifically, I have found this useful
when there are planned outages or maintenance on the LOB systems. In other
words there is one place to look from support perspective when something
happens.
Ø
Logistical Setup of this Orchestration:
1.
Create a BizTalk Project and Add New Item…..and
select Orchestration. (not getting into the naming conventions etc…maybe
another blog idea)
2.
Add the following shapes in top-down sequence
a.
Receive
b.
Expression
c.
Message Assignment
d.
Send
3.
On the Port Surface, add 2 Logical ports:
a.
Always Receive messages and Specify Later
b.
Always Send messages and Specify Later
4.
Add 2 Message Type:
a.
Incoming Message:
i.
Name: msg_AnyIdocXML_In
ii.
Type: System.Xml.XmlDocument
b.
Outgoing Message
i.
Name: msg_AnyIdocXML_Out
ii.
Type: System.Xml.XmlDocument
5.
Add one variable
a.
Name: MsgNS
b.
Type: System.String
6.
Add one Correlation Set and Correlation Type.
Steps:
a.
Right click Correlation Set and Select New
b.
Under properties change name if required
c.
From Correlation Type Drop-down select “Create
new Correlation Set”
d.
The screen jumps to the Correlation Set
Property….look for “Correlation Properties”
e.
Click the … and it will bring up the following
screen.
f.
Expand the “WCF” section and Add “Action”
i.
This is the property which is equal to the Namespace
of the IDOC Schema that was generated
using the Consume Web Service option (another blog on this)
ii.
This property can be different depending on
which WCF end-point we need to send these messages to.


Ø
Now we need to button up the Orchestration in
the following order (not necessary however, it’s a good development practice so
we don’t miss something)
A.
Receive Shape:
a.
Select the message “msg_AnyIdocXML_In”
created before from the drop down
B.
In the Get Vars
Expression Shape put the following one line code:
MsgNS =
xpath(msg_AnyIdocXML_In, "string(namespace-uri(/*))");
·
This is assigning the variable “MsgNS”the
namespace of the received IDOC XML message as in my example IDOC Namespace is
the same as the WCF Action needed by the Send Port to send this message to SAP
using WCF SAP Adapter

C.
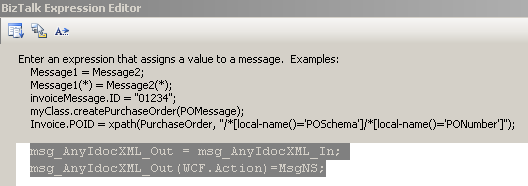
On the Message Assignment Shape set
a.
Select
Message Constructed property = “msg_AnyIdocXML_Out”
created before from the drop down
b.
Double Click the Message Assignment inside the
Construct Message and enter the following code:
msg_AnyIdocXML_Out
= msg_AnyIdocXML_In;
msg_AnyIdocXML_Out(WCF.Action)=MsgNS;
·
This is passing the incoming message and
assigning it to the outgoing message type
·
Then it is setting the WCF Action and assigning
the Namespace value captured before
D.
Send Shape:
a.
Select the message “msg_AnyIdocXML_Out”
created before from the drop down
b.
From the drop down for Initializing Correlation
Sets, select the Correlation set created before (Step # 6)

E.
Drag the Receive Logical Port to the Receive
Shape.
F.
Then Activate the Receive Shape

G.
Drag the Send Shape to the Send Logical Port
Ø
Sign and set the deployment for the project and
deploy. Right Click Project – Deploy
Ø
Run Time Setup after deployment.
A.
Open BizTalk Administration Console and expand
to the application where the Orchestration is deployed.
B.
Created a Physical Receive Port to pick up any
SAP IDOC XML Files.
§
This is important to note as this will be the
generic location that all the other processes (post-mapping etc…) will submit
files to
C.
Create a Send Port with WCF-Custom Adapter
§
Select WCF-Custom on the Adapter list drop down
§
Click Configure …
§
For the Address URI (address for WCF Endpoint)
SAP in this case enter the following: (again this is the basic connection
string, which you may need to change based on your requirement)
sap://CLIENT=100;LANG=EN;@a/{SAP Server Address/IP}/{Client ID}?&RfcSdkTrace=False&AbapDebug=False
** Note the underline text between
curly brackets is the environment specific value.
§
Under Binding Tab Select the Binding Type = “sapBinding”
§
Under Credentials Tab select the appropriate
option and enter the details. Usually there is a user assigned by SAP Team with
a password
§ Go back to the General Tab and here is the Fun Part:
§ Go back to the General Tab and here is the Fun Part:
·
Under SOAP Action Header put the following
<BtsActionMapping xmlns:xsi="http://www.w3.org/2001/XMLSchema-instance"
xmlns:xsd="http://www.w3.org/2001/XMLSchema">
<Operation Name="SendToSAP"
Action=""
/>
</BtsActionMapping>
§
Pay attention to the text in RED above.
§
The Operation Name should be the same as set in
the Orchestration
§
By Default this name is “Operation_1” like it
adds in Orchestration when you first create it. Until you purpose
fully change it which you should to make it more tuned to what it is.
§
Secondly, the Action is supposed to be blank
as this is what the Orchestration is actually setting and promoting as a
Context property
§
If this Action element has an
value, then it simply overrides the value coming from Orchestration making the
orchestration use pretty much useless.

D.
After all the above setup
§
Go to the Orchestration and bind the
orchestration with:
·
Host
·
File based Receive Port created in Step B
·
WCF-Custom based Send Port created in Step C
E.
Start the Ports and Orchestration
F. You are ready to test and implement this Generic IDOC loader process.
F. You are ready to test and implement this Generic IDOC loader process.
Ø
Other Considerations:
1.
In this example I needed the WCF.Action
property to be dynamic for SAP Adapter /Send Port Setting.
2.
However this can be used to dynamically assign
other properties like:
a.
Target LOB Server Address
b.
User ID and Password
3.
These values can of-course be read from SSO DB or some
other secured way (Enterprise Library?) – Complicated ways or
4.
Simply these values can be read from a standard
XML config File like BTSNTSvc.exe.config
Created by: Amit Kumar
contact: technoamit@gmail.com
web-site: http://quicksolutionsinc.us
Created by: Amit Kumar
contact: technoamit@gmail.com
web-site: http://quicksolutionsinc.us
No comments:
Post a Comment